Raspberry Pi + Simhub based dash designed for the Elephoont fanatec CS DD FFBeast housing.
This may also work with the official fanatec CS DD but I can't guarantee it's functionality.
The design includes a safe shutdown button on the back to shut down the pi after use without needing to connect a keyboard or connecting via SSH.

BOM:
- Raspberry pi 4B
- MicroSD card
- 3.5" SPI LCD Display - AliExpress
- UGreen 90 degree USB-C cable 1m
- KW11-3Z-A Microswitch without lever - AliExpress
- M2.5x5mm screws (can be longer)
- M3x10 (can be up to 17mm)
- 2x Heat set inserts M3xD5xL4 - AliExpress
- M6x6 set screw (could be a normal screw but it'd have to be slightly longer and wouldn't look as nice)
- Dupont or JST crimping set for the switch wires for easier connecting to the pi (Dupont is the official way but I'm pretty sure you can get away with a JST connector of the same pitch)
Assembly:
Print of the two parts needed and install the two heat set inserts, one on either side of the base, these are for securing the front plate later on.
If your printer has trouble with tighter tolerances try printing the parts with an added 0.2mm tolerance!
Start by wiring and soldering up the microswitch and placing the microswitch into the base with the nub part centered on the button of the base so it makes optimal .
When crimping on the connectors (if not using existing dupont jumper cables) you may have to shorten the connector a little bit as to not interfere with the display.
Now thread the 2 M3 screws in the base and through the microswitch.
This might be a bit stiff as you are tapping thread through the microswitch's plastic housing to secure it.
Do not overtighten the screws, snug is enough.
Plug in the USB-C cable and install the raspberry pi onto the base using the M2.5 screws.
Be careful as to not squish the switch's wires.
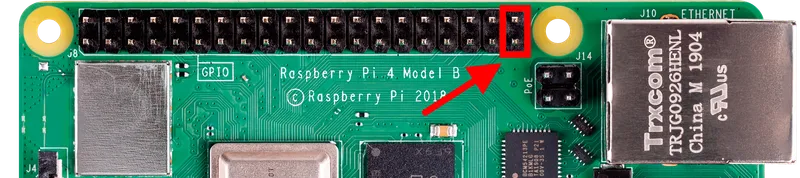
Connect the Microswitch to the Raspberry pi on the 2 pins closest to the ethernet port (GND, GPIO21 - Pins 39 and 40).
- Install the LCD onto the raspberry pi making sure it's all seated properly.

Before sealing up the contraption we should set up the pi first.
Setup will be different from other videos/guides online as most people use HDMI displays not SPI based displays.
The downside of using SPI displays is that they are a bit more finnicky to set up, more generic drivers and usually have a refresh rate of 15 to 20hz (depending on which display you get it can be higher).
the main benefit of these displays is their low cost and smaller formfactor due to not needing the bulky HDMI through adapter board.
I would have opted for the HDMI screen myself but I already had the SPI version laying around so that's what I based this design on (the HDMI version will not fit without modifications to the files, STEP files included)
Start by flashing the latest version of raspbian (64 bit) onto your SD card using the Raspberry Pi Imager
After installing raspbian, place the card into the raspberry pi and boot it up.
Next up connect the pi to either a monitor or SSH into the pi.
Update the pi using:
sudo apt update && sudo apt upgrade -y
From here on out we will start by installing the LCD driver by executing the following commands:
                 sudo rm -rf LCD-show

                 git clone https://github.com/goodtft/LCD-show.git

                 chmod -R 755 LCD-show

                 cd LCD-show/

                 sudo ./LCD35-show
After completing the above commands the Pi should reboot and you should have a beautiful desktop visible on the screen!
Beware due to an ongoing bug it may take upwards of 2 minutes for the desktop to load.
However there is a temporary workaround.
By executing the following:
                 sudo systemctl mask dev-dri-card0.device

                 sudo systemctl mask dev-dri-renderD128.device
And rebooting afterwards.
This should resolve the long boot times.
Next up we will install an application called unclutter which will hide the mouse cursor unless moved.
sudo apt install unclutter
We will also want to disable any notifications.
So now that the LCD is working, use a mouse to rightclick the taskbar and in it's settings disable all notifications.
We have to set up the pi so that it automatically starts a chromium browser page in kiosk mode displaying our simhub dash!
We do this by opening the following:
sudo nano /etc/xdg/lxsession/LXDE-pi/autostart
And pasting this at the bottom of the file
```
@lx --profile LXDE-pi
@pcmanfm --desktop --profile LXDE-pi
@xscreensaver -no-splash
@unclutter -idle 0.1 -root
#Disable any form of screen saver / screen blanking / power management
xset s off
xset s noblank
xset -dpms
#Allow quitting the X server with CTRL-ATL-Backspace
setxkbmap -option terminate:ctrl_alt_bksp
#Start Chromium in kiosk mode
sed -i 's/"exited_cleanly":false/"exited_cleanly":true/'
~/.config/chromium/'Local State'
sed -i 's/"exited_cleanly":false/"exited_cleanly":true/; s/"exit_type":"[^"]+"/ "exit_type":"Normal"/' ~/.c>chromium-browser --disable-infobars --kiosk 192.168.178.69:8888/DASHOFYOURCHOOSING
You can access this file by doing:
sudo nano /etc/xdg/lxsession/LXDE-pi/autostart
```
And then hitting Ctrl+X, Ctrl+Y to save and exit.
Make sure to replace the IP address to to the one provided by Simhub!
The Dash of your choosing can be found by test opening the IP on your desktop.
For example the dash in the pictures above is: Dash#AIM%20GS-DASH
Now for the final step, setting up the safe shutdown button sequence!
Open the following file:
sudo nano /boot/firmware/config.txt
And paste in the following at the bottom:
                 #Shutdown

                 dtoverlay=gpio-shutdown,gpio_pin=21
And now your pi should be set up and ready to use!
So you can finish the build by installing the front plate, sliding it into your wheelbase from the back (you need to remove the back cover of the wheel base) and lightly tightening the set screw to secure it in place!


/https://preview3d-images.cults3d.sitegames.net/7c9axhuyx2sby0ewvbx76e37g5i0)
/https://preview3d-images.cults3d.sitegames.net/5ybldn0xucglw54qo4pr71ajxr9v)
/https://preview3d-images.cults3d.sitegames.net/dxkkfmerjvebexo5u56oilnxs7x8)
/https://preview3d-images.cults3d.sitegames.net/84s1r384hf9fxueg4glqwqbmbr1e)


